HubSpot provides a powerful platform for businesses to manage their marketing, sales, customer service, and more. As a HubSpot app developer, you can build custom apps that extend the functionality of HubSpot’s ecosystem, allowing for deeper integrations and tailored solutions for businesses. Here’s a quick guide.
Why Build a HubSpot App?
HubSpot’s marketplace has a vast range of apps, but building your own app gives you the flexibility to:
- Automate workflows tailored to specific business processes.
- Integrate third-party services like CRMs, ticketing systems, or payment gateways.
- Customize user interactions within the HubSpot ecosystem.
By developing an app, you can streamline operations, improve customer relationships, and enhance your overall HubSpot experience.
Steps to Build a HubSpot App
1. Create a HubSpot Developer Account
Start by signing up for a HubSpot developer account. This will give you access to the developer dashboard, where you can create and manage your apps.
2. Register Your App
In the developer dashboard, create a new app by providing essential details such as the app name, description, and authentication settings. You’ll also define the scopes your app will need to access specific data (e.g., tickets, contacts, or marketing events).
3. Set Up OAuth
HubSpot apps use OAuth for authentication, ensuring secure access to users’ data. You’ll need to implement the OAuth 2.0 flow in your app, allowing users to connect their HubSpot accounts.
4. Leverage HubSpot APIs
HubSpot offers a wide range of APIs, such as CRM, tickets, and conversations. Depending on your app’s functionality, use these APIs to read and write data from HubSpot, automate workflows, or handle customer support.
5. Receive Webhook Notifications
To stay updated on real-time events (like new ticket creation or status updates), set up webhooks. HubSpot’s webhook system allows your app to subscribe to specific events and respond to them.
6. Testing and Deployment
Before publishing your app, test it thoroughly in your HubSpot developer account. Once satisfied, you can submit it to HubSpot’s marketplace for review and distribution to a broader audience.
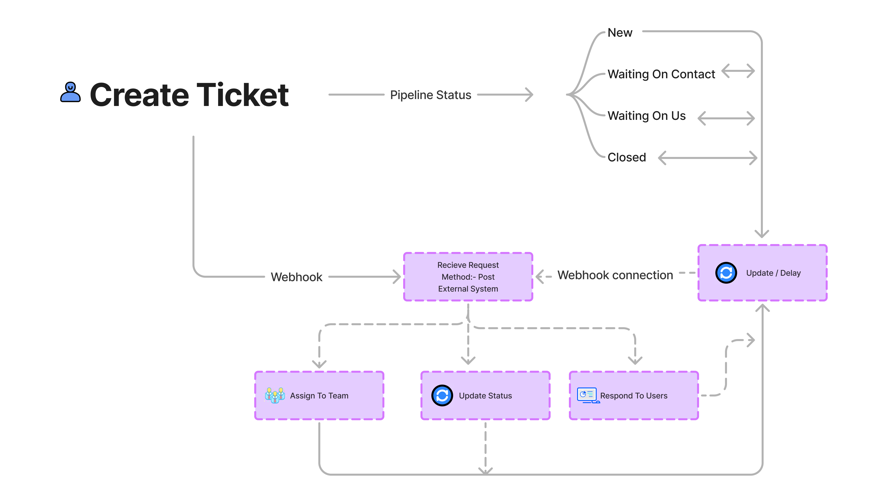
Example Use Case: Ticket Management App
Let’s say you’re building a ticket management app that listens for new tickets created in HubSpot. When a ticket is created, your app can:
- Receive webhook notifications for new tickets.
- Fetch the ticket details using HubSpot’s CRM API.
- Process the ticket (e.g., assign it to a team).
This flow automates ticket management, improving response times and customer satisfaction.
Developer Integration Flow
Here’s a step-by-step guide for integrating HubSpot Tickets, Contacts, and Marketing Events with webhooks to streamline your operations and trigger real-time notifications in external systems.
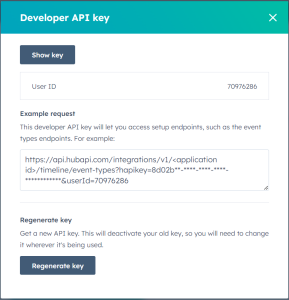
1. Create a HubSpot Developer Account
To start, you’ll need a HubSpot developer account to access HubSpot’s APIs and webhook setup. This account gives you a dashboard where you can create and manage your apps.
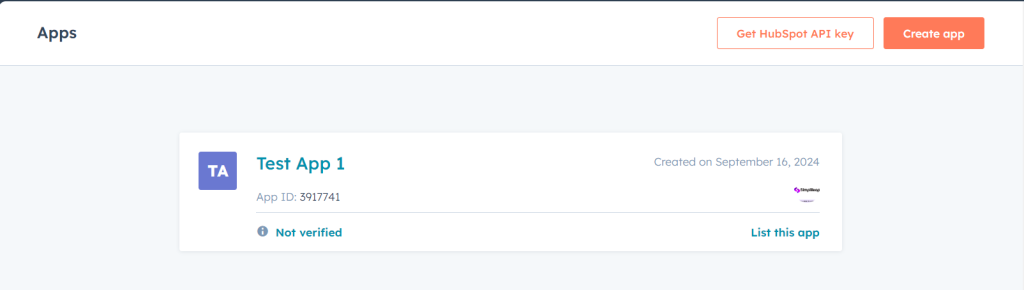
2. Register Your App
In the developer dashboard:
- Go to the Apps section and create a new app.
- Fill in details like the app name and description.
- Define the permissions (scopes) your app will need, such as:
- Tickets: for handling ticket-related events.
- Contacts: for accessing or updating contact records.
- Marketing Events: for tracking events like email campaigns.
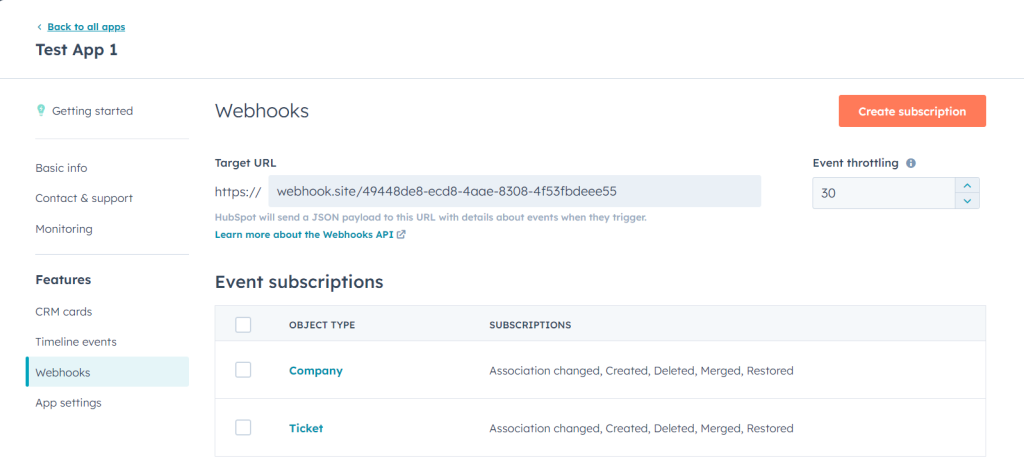
3. Set Up Webhooks
HubSpot’s webhook system allows you to receive notifications whenever specific events occur. Here’s how to configure it:
In the Webhook settings of your app, add webhook subscriptions for the following:
- Tickets: Triggered when tickets are created, updated, or closed.
- Contacts: Triggered when a new contact is added or an existing contact is updated.
- Marketing Events: Triggered when marketing events like email sends or form submissions occur.
For each webhook, provide the URL where HubSpot should send the POST requests. This URL should be an endpoint in your external system that handles the incoming data.
4. Handle Webhook Responses
Once a webhook is triggered, HubSpot will send a POST request with relevant data. Set up your external system to:
- Tickets: Assign tickets to teams, update statuses, or escalate tickets based on the received data.
- Contacts: Update or synchronize contact information with your CRM or other systems.
- Marketing Events: Track marketing activities like opens, clicks, or form submissions.
Ensure your system processes the webhook data and returns a 200 HTTP status code to confirm successful receipt.
5. Secure Your Webhook Endpoint
- Use OAuth to authenticate the HubSpot app.
- Enable HTTPS for your webhook URLs to ensure data is transferred securely.
- Optionally, validate the incoming webhook request by verifying the HubSpot signature.
- POST /oauth/v1/token
6. Test Your Webhooks
HubSpot provides a way to test your webhooks:
- Trigger test events for tickets, contacts, or marketing activities within HubSpot.
- Check that your external system is correctly receiving and processing the data.
7. Monitor and Maintain
Once your webhooks are live, ensure you:
- Monitor for failed webhook attempts. HubSpot retries up to three times if it doesn’t receive a 200 status code.
- Implement logging and error handling in your system to keep track of webhook failures.
Example Workflow
Ticket Creation
- A customer submits an issue through a support form.
- HubSpot creates a new ticket and triggers a webhook to your system.
- Your system assigns the ticket to the appropriate support team and notifies them.
- HubSpot sends an update when the ticket is closed, triggering another webhook to update your internal system.
- POST /crm/v3/objects/tickets || PATCH /crm/v3/objects/tickets/{ticketId} || GET /crm/v3/objects/tickets
Contact Update
- A sales representative updates a contact’s details in HubSpot.
- The update triggers a webhook to your system, synchronizing contact information with your CRM.
- POST /crm/v3/objects/contacts || PATCH /crm/v3/objects/contacts/{contactId} || GET /crm/v3/objects/contacts
Marketing Event Tracking
- A customer clicks on an email link or submits a form.
- HubSpot triggers a webhook with event details, allowing your system to log the event for analytics or further actions.
- POST /marketing/v3/events || GET /marketing/v3/events
Conclusion
Building a HubSpot app offers endless possibilities to extend and personalize the HubSpot experience. Whether you’re creating custom workflows, automating tasks, or integrating external services, HubSpot’s APIs and webhooks make it easier to deliver robust solutions. Start experimenting today by exploring the HubSpot developer documentation.
By integrating HubSpot Tickets, Contacts, and Marketing Events with webhooks, you can automate workflows and ensure real-time synchronization between HubSpot and external systems. This helps improve operational efficiency and provides timely insights across departments.

Shivraj Patil is a versatile full-stack developer with expertise in JavaScript, React.js, Node.js, and blockchain crypto technology etc. Specializing in payment APIs and crypto integrations, they handle secure transactions across assets. With strong backend skills in PostgreSQL and performance testing, they also create seamless frontend experiences. Known for solving complex technical challenges and integrating real-time systems, Shivraj Patil is dedicated to delivering high-quality, scalable solutions.


