
What is WooCommerce?
WooCommerce is a WordPress plugin that lets you set up an online store on your WordPress site. Its ease of installation, use, and configuration allows customers to simply establish their e-commerce websites. WooCommerce also allows users to customise their stores by offering multiple features such as variable product costs, shipping fees, maintenance of stock levels, taxation, coupon codes, customer reviews and much more. Users can tailor their website shopping experience and their checkout process.
This guide contains answers to frequently asked WooCommerce questions that will help you set up your online store quickly and effortlessly.
WooCommerce make phone number required.
To make the phone number field required on the checkout page of your site, navigate to the Appearance ➞ Customize tab.
Next, select WooCommerce followed by Checkout. Here, you can find the option to make the phone number field of the checkout form required.

WooCommerce make checkout field required.
This can be done by adding some custom code to your themes functions.php file. To access this file navigate to your website’s “wp-content/themes/” directory and locate the folder of the currently active theme. Inside the theme’s folder, you’ll find the functions.php file.
Then place the following code at the end of your themes functions.php file:
add_filter( ‘woocommerce_default_address_fields’, ‘customising_checkout_fields’, 1000, 1 );
function customising_checkout_fields( $address_fields ) {
$address_fields[‘first_name’][‘required’] = true;
$address_fields[‘last_name’][‘required’] = true;
$address_fields[‘company’][‘required’] = true;
$address_fields[‘country’][‘required’] = true;
$address_fields[‘city’][‘required’] = true;
$address_fields[‘state’][‘required’] = true;
$address_fields[‘postcode’][‘required’] = true;
return $address_fields;
}
add_filter(‘woocommerce_billing_fields’, ‘custom_billing_fields’, 1000, 1);
function custom_billing_fields( $fields ) {
$fields[‘billing_email’][‘required’] = true;
$fields[‘billing_phone’][‘required’] = true;
return $fields;
}
WooCommerce make product featured.
In order to make a product a featured one using WooCommerce, navigate to your products page. Then click on the star icon of the product you want to feature. A product with a filled-in star is classified as a featured product.

You could also choose to feature a product by selecting quick edit on the product and checking the box for featuring that product.
To display the featured product on your shop page you can add the following shortcode [featured_products per_page=”8″ columns=”4″ orderby=”date” order=”desc”]. Using this shortcode, eight of your featured products will be shown in a grid (four columns by two rows), with the most recent appearing first. You can customize the numbers based on how you want your featured products to appear on your page.
WooCommerce make product images same size.
In order to change the image sizes of your products on the shop page, you can navigate to the Appearance ➞ Customize tab.

Then select WooCommerce followed by Product Images

Here, you can customize the height and width of your product images in the value of pixels.
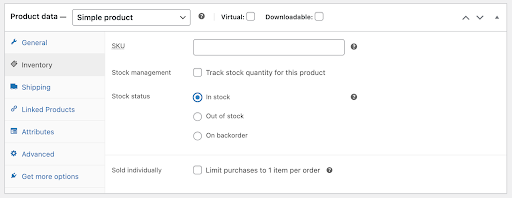
WooCommerce make product not purchasable.
You can make selected products or all of them non-purchasable by making some changes to your products in the admin panel or by adding some custom code.
- Method 1: Making changes in the admin panel:
- – Empty the price field for the product
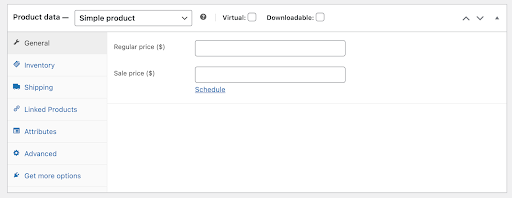
- – Marking the product as “Out of stock” in the Inventory tab
Method 2: Adding custom code using “woocommerce_is_purchasable”:
You can add some custom php code into your website’s functions.php file which you can access from the wp-includes folder. To do so you can use the wp file manager plugin or any other plugins available. You can also access this file directly from your website WordPress installation file.
- – To make all products non-purchasable:
You can add the following code at the end of your sites functions.php file:
add_filter( ‘woocommerce_is_purchasable’, ‘__return_false’ ); - -To make products of specific ID’s non-purchasable:To get the ID of a product navigate to the Products ➞ All Products tab.
- Then, hover over the specific product to view its respective product ID

- After locating all the respective product ID’s you can add the following code at the end of your sites functions.php file:
add_filter( ‘woocommerce_is_purchasable’, ‘make_product_not_for_purchase’, 10, 2 );
function make_product_not_for_purchase( $is_purchasable, $product ) {
$not_purchasable_products = array( 123, 45, 789 );
if( in_array( $product->get_id(), $not_purchasable_products ) ) {
$is_purchasable = false;
}
return $is_purchasable;
} - You could include as many product IDs as you want in the $not_purchasable_products variable.
- – To make products of specific categories or product tags non-purchasable:
You can add the following code at the end of your sites functions.php file: - add_filter( ‘woocommerce_is_purchasable’, ‘make_product_not_for_purchase’, 10, 2 );
- function make_product_not_for_purchase( $is_purchasable, $product ) {
// First – check product categories
if( has_term( ‘uncategorized’, ‘product_cat’, $product->get_id() ) ) {
$is_purchasable = false;
}
// Second – check product tags
if( has_term( ‘newyearsale’, ‘product_tag’, $product->get_id() ) ) {
$is_purchasable = false;
}
return $is_purchasable;
}
WooCommerce make shop homepage.
You can make a default WooCommerce shop page easily by adding a new page with the following shortcode in it – [products]. Once this shortcode has been added the default WooCommerce shop page will be displayed with all the added products.
Next, navigate to Settings ➞ Reading
Here you may select which page should be your website’s homepage; simply select the shop page you designed, and it will open as the homepage whenever a person visits the website
WooCommerce make product image clickable.
This can be done by adding some custom code to your themes functions.php file. To access this file navigate to your website’s “wp-content/themes/” directory and locate the folder of the currently active theme. Inside the theme’s folder, you’ll find the functions.php file.
Here, we will be editing the “woocommerce_get_product_thumbnail” function. This is what your code should look like before making any changes:
if ( ! function_exists( ‘woocommerce_get_product_thumbnail’ ) ) {
/**
* Get the product thumbnail, or the placeholder if not set.
*
* @subpackage Loop
* @param string $size (default: ‘shop_catalog’)
* @param int $deprecated1 Deprecated since WooCommerce 2.0 (default: 0)
* @param int $deprecated2 Deprecated since WooCommerce 2.0 (default: 0)
* @return string
*/
function woocommerce_get_product_thumbnail( $size = ‘shop_catalog’, $deprecated1 = 0, $deprecated2 = 0 ) {
global $post;
if ( has_post_thumbnail() ) {
return get_the_post_thumbnail( $post->ID, $size );
} elseif ( wc_placeholder_img_src() ) {
return wc_placeholder_img( $size );
}
}
}
Now replace this code with:
<?php
if ( ! function_exists( ‘woocommerce_get_product_thumbnail’ ) ) {
/**
* Get the product thumbnail, or the placeholder if not set.
*
* @subpackage Loop
* @param string $size (default: ‘shop_catalog’)
* @param int $deprecated1 Deprecated since WooCommerce 2.0 (default: 0)
* @param int $deprecated2 Deprecated since WooCommerce 2.0 (default: 0)
* @return string
*/
function woocommerce_get_product_thumbnail( $size = ‘shop_catalog’, $deprecated1 = 0, $deprecated2 = 0 ) {
global $post;
if ( has_post_thumbnail() ) {
return ‘<a href=”‘ . get_permalink( $post->ID ) . ‘”>’ . get_the_post_thumbnail( $post->ID, $size ) . ‘</a>’;
} elseif ( wc_placeholder_img_src() ) {
return wc_placeholder_img( $size );
}
}
}
By adding return ‘<a href=”‘ . get_permalink( $post->ID ) . ‘”>’ . get_the_post_thumbnail( $post->ID, $size ) . ‘</a>’; We can ensure that each product image is clickable along with its respective post ID
WooCommerce make email optional.
This can be done by adding some custom code to your themes functions.php file. To access this file navigate to your website’s “wp-content/themes/” directory and locate the folder of the currently active theme. Inside the theme’s folder, you’ll find the functions.php file.
Then place the following code at the end of your themes functions.php file:
add_filter( ‘woocommerce_billing_fields’, ’email_field_non_required’, 9999, 2 );
function email_field_non_required( $fields, $country ) {
// Billing email field.
if( isset( $fields[‘billing_email’] ) ) {
$fields[‘billing_email’][‘required’] = false;
}
return $fields;
}
In this developer guide, we’ve answered some common WooCommerce questions to help you get started with your online store. From needing phone numbers to customizing checkout fields, making products featured, and adjusting picture sizes, to making products non-purchasable, setting up store homepages, and making product photos clickable. With these solutions, your WooCommerce experience can be tailored to your needs.
For any further assistance regarding Woocommerce, WordPress or other queries relating to setting up your online store, feel free to reach out to us at info@simplileap.com.

Fueled by a passion for constant learning, I’m diving into the worlds of technology and web development. Despite being new to these fields, I thrive on challenges and love learning and experimenting with various programming languages. Working at Simplileap, I eagerly seize every chance to grow under their guidance. With my determination and enthusiasm, I’m committed to excelling in my career and becoming a valuable asset in the tech industry.


